Troubleshooting Manual
Introduction
Almost any piece of outdoor power equipment is bound to run into occasional issues from time to time due to the rigors and the elements they are constantly exposed to over the course of their work time. As a result it’s important that you regularly service and maintain your lawn mowers on a frequent basis to prolong their life and ensure that none of the issues escalate into anything more serious. The positive side is that none of these issues are very serious and for the most part, they can all be fixed without having to visit an authorized service center. Having said that however, if you’re not experienced with handling power tools or are not comfortable repairing them yourself, do not hesitate to seek professional help.
Always keep your safety first
Before you operate your mower or attempt to repair any of its parts, ensure that you have taken the time to go through all the safety guidelines. A mower is a potentially dangerous tool with a number of blades and moving parts that can inflict serious damage if not used appropriately – this is the case with almost any power tool.
- Make sure that you thoroughly read and make yourself familiar with all the instructions mentioned in the owner’s manual and the engine manual before you begin operating the unit
- Learn all the safety signs, decals and the other mentioned signals for hazard
- Do not allow anyone else to use the machine unless you are thoroughly satisfied that they are familiar with the handling of a lawn mower
- Do not allow children to operate the mower or ride along with you while you operate the mower under any circumstances
- Before you mow any area spend some time evaluating the terrain and make sure that the place is clear of any debris or other potentially hazardous substances
- Never wear loose fitting clothing when operating the mower as this can easily get caught up within the system’s hardware. Always wear appropriate clothing
- Remove any toys, rocks, pebbles and other obstacles from the mowing area before you begin to mow over a patch
- Ensure that children and pets are not outdoors when operating the mower
- Be particularly cautious when handling flammable substances around the machine, such as gasoline. Do not ever leave the machine’s fuel tank open when operating
- Never handle gasoline in closed, unventilated spaces as the fumes are highly toxic and evaporate readily
- Mow only in the day or when you have ample artificial lighting if mowing at the night
- Ensure that you always start the engine only from the operator’s side after securely positioning yourself on the unit
- When operating the mower on hillsides and sloping surfaces, ensure that you handle the mower at a lower than usual speed
- Be particularly cautious when making turns or changing the direction of travel when you’re on a sloped surface or incline
- Never attempt to raise the deck height when the blades are running
- Ensure that you turn off the PTO control to stop the blades when you’re not mowing
- The guards must be securely in place every time you operate the mower – do not operate the mower if these interlocks are not properly attached to the chassis
- If you strike an object while mowing, stop the unit immediately and inspect the blades
- Be particularly careful when approaching blind spots or areas of low visibility
- Never over-speed the engine as this can severely shorten its life and increase repair costs
- Always mow only up and down slopes and not across the plane of the slope
- Use the slowest possible speed setting when mowing on slopes or inclined surfaces.
Ferris Mowers Maintenance
Ferris mowers are known as one of the most reliable mowers on the market. If maintained properly they won’t require any service for years. Table below will help you to determine what tasks should be performed at what itervals
Table 1 Ferris mowers maintenance works schedule
| Time Frame | Task |
|
Before first use
|
Check the mower’s safety interlock system |
| Check the engine’s oil level | |
| Check the tire pressure | |
| Check the mower rider’s brakes and braking system as well as cables | |
| Check the mower blade’s stopping time and clutch | |
|
Daily
|
Check the mower for loose hardware parts |
| Inspect tire pressure | |
| Check the engine’s oil level | |
| Check the engine’s air filter | |
|
Every 5 hours
|
Check the mower for loose hardware parts |
| Check the engine’s oil level | |
|
Every 25 hours
|
Change the engine’s oil filter |
| Change the engine’s air filter | |
| Check the mower’s tire pressure | |
| Inspect the hydraulic fluid levels | |
| Lubricate the mower’s components | |
|
After 100 hours
|
Check the mower blade’s stopping time and clutch |
| Change the engine’s oil filter | |
| Change the engine’s air filter | |
| Inspect the engine’s fuel filter | |
| Clean out the battery and its cables | |
| Inspect the mower’s spark plug | |
| Sharpen the blades | |
| Check the mower’s tire pressure | |
|
Each season
|
Check the mower’s safety interlock system |
| Check the mower rider’s brakes and braking system as well as cables |
Identifying the various controls
It’s crucial that you thoroughly understand all the mower’s various controls before you begin to operate the mower – it’s a good idea to spend some time on a flat patch getting used to these various levers before you begin to use it on the lawn.
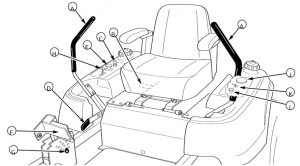
A) Ground speed control lever: These levers allow you to manipulate the mower’s maximum speed and also enable you to steer the unit to your left, right or move in the reverse direction
B) Seat adjustment lever: This lever allows you to manipulate the position of the driver’s seat and slide forwards or backwards based on your ideal seating position
C) Ignition switch: This is where you will start or stop the engine, or turn on the various electrical functions of the unit – ensure that you never leave the mower for prolonged periods in the ‘RUN’ position as this will quickly drain out the battery
D) Parking brake handle: This lever allows you to engage or dis engage the parking brake by either pulling it up or releasing it by pushing down the handle
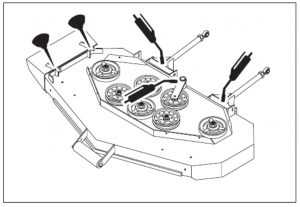
E) PTO Switch: The PTO switch allows you to control the supply of power from the engine to the main blade unit
F & G) Deck lift and Cutting Height Adjustment: These levers enable you to manipulate the height of the mower, either on a temporary basis – with the deck lift – or for a long-term cutting session
H) Throttle control: This control allows you to manipulate the engine’s throttle speed and increase the engine speed if necessary. It recommended that you always run the engine at the highest throttle speed
I) Choke: The choke is useful for cold starts when the temperature surrounding your location is too low for regular starting
J) Hour meter: The measure the amount of hours for which the mower’s PTO system has been engaged
K) Fuel shut off valve: This valve allows you to control the flow of gasoline to the main power unit
Basic operations
Starting the mower: Engage the unit’s parking brake when sitting on the driver’s seat and ensure that the PTO switch is disengaged – the motion control handles must also be in the neutral position to turn on the engine. Now insert the key into the ignition and fully close the main choke by pulling out the knob completely. Turn the ignition key to crank the engine to a start and then slowly release the choke by pushing down the knob until it goes all the way in. Ensure that you always operate the mower at the maximum throttle setting
Stopping the mower: Bring the mower back to ground speed and halt the unit by aligning the two levers to stop all movement. Now disengage the PTO belts by turning off the PTO switch and proceed to close the choke to the original position. Engage the parking brake and then lock it into position before turning the ignition key to the OFF setting
Pushing the mower by hand: Ensure that the PTO switch has been deactivated before you attempt to move the mower, turn off the ignition and wait for all moving parts to come to a stop. Now proceed to raise the seat and disengage the hydraulic pumps to put the wheels in the free motion position – you can do this by rotating the release valve (A) in the counter-clockwise direction. Now you can disengage the parking brake and push the tractor by hand. Once the unit has been relocated, reactivate the pumps by turning the valves back in the clockwise direction.

Moving and steering
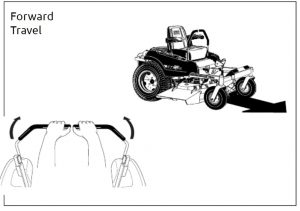
Moving forward: Push both levers in the forward direction in order to gradually move forwards – it is recommended that you push the levers in a gradual manner and avoid jerky motions as these can cause the unit to lean dangerously or put undue stress on the engine, drastically shortening its lifespan. Also ensure that you push both levers in the same direction evenly, taking care not to go too fast on uneven terrain. It may take a bit of practice to push both levers evenly and achieve true straight line travel so its recommended that you first practice this by operating the mower for a few hours on a dry patch of land. You can also balance adjust the top speed if it’s required.
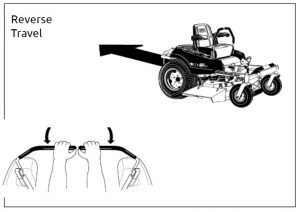
Moving backwards: Just as with the forward motion instructions, gently pull back both the levers evenly in a gradual manner while attempting the reverse the mower – remember to practice extra caution while going backwards and move as slowly as you can afford to. Also ensure that you are looking backwards and down while moving reverse. As with moving forward, it might take a bit of practice to achieve true movement in the reverse direction so try to get a few hours of driving on a empty area. Never sharply pull the levers back to reverse fast as this can be very dangerous.
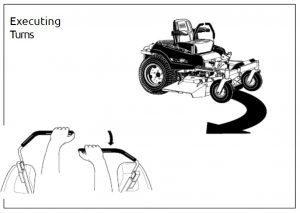
Steering normally: In order to steer the mower to your left or right side, hold the corresponding lever in place and push the opposite lever in the forward direction – away from you. So if you intend to move to steer left for instance, hold the left lever in place and gently push the right lever in the forward direction to execute a left turn. Mirroring this action with the opposite controls allows you to perform a normal turn towards the right side. Do not turn very steeply, especially on inclined surfaces.
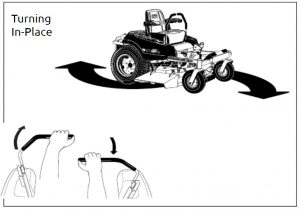
Zero-turn steering: In order to execute a zero-degree turn, you will need to pull the lever corresponding towards the direction of intended steering towards you while pushing the opposite lever away from you – this will cause the wheels on either side of the unit to steer in opposite directions and allow you to execute a turn on a significantly smaller radius. To perform a zero-turn to your right for instance, pull the right lever towards you while pushing the left lever away from you.
Ferris mowers troubleshooting
Like any other well known companies mowers, Ferris mowers may experience a fault from time to time. Most of the faults can be avoided by proper maintenance. We have created table below for you to be ble to determine/fix most common faults
Table 2 Ferris mowers troubleshooting- applicable for all models
| PROBLEM | POSSIBLE CAUSE | SOLUTION |
|
Engine not starting
|
Parking brake has not been engaged | Activate the parking brake |
| PTO switch is turned ON | Turn off the PTO switch | |
| Engine is out of fuel | Refuel the tank | |
| Engine may have flooded | Wait for the engine to clear | |
| Fuse might have blown | Replace the fuse with a new one | |
| Battery might have died | Replace the battery or charge it | |
| Spark plug is faulty | Clean or replace the spark plug | |
| Fuel filter is dirty | Clean or replace the fuel filter | |
|
Engine runs poorly
|
Fuel mixture is too high | Clear out the air filter and adjsut the choke |
| Spark plug gap may be larger | Reset the spark plug gap | |
|
Engine knocking
|
Oil level in the engine is low | Replenish the engine oil |
| Wrong grade of engine oil being used | Check the engine manual to find the appropriate oil | |
|
Excessive vibration coming from mower
|
Blade’s mounting bolts might have come loose | Tighten the mounting bolts securely |
| Mower’s blades might be bent | Replace the blades | |
| Blades might be unbalanced | Sharpen the blades uniformly | |
| Drive belt may not be properly installed | Re-install the belt correctly | |
| Blade shaft may be bent | Replace the blade shaft | |
| Blade pulleys may be bent | Replace the blade’s pulley | |
|
Brake not holding the mower
|
Brake calipers are worn out | Replace the calipers with new ones |
| Brake may not be correctly adjusted | Adjust the blade correctly | |
| Unable to raise the mower | Lifting linkage system may be damaged | Visit the authorized service center |
|
Engine stalling when mower activated
|
Engine speed may be too low | Increase the engine to full throttle |
| Ground speed might be high | Lower the moving speed | |
| Cutting height might be too low | Raise the cutting height | |
| Discharge chute could be clogged | Clean out the chute |
Lubricating the unit
It’s important that you perform regular lubrication of the unit in order to prolong the life of its components and avoid major issues – failure to regularly lubricate these parts can result in drastic damage from time to time. Ensure that you grease all major parts such as the front caster wheel axles, the deck lift pivots, the deck lift foot pedal, mower deck idler arm and the other pulleys within the deck. Ensure that you also apply oil on the control handle pivots, floor plate hinge and the discharge chute hinge. All moving metal parts need to be well oiled in order to prevent corrosion.